
Airport Sling Sew Along - Post #2: Creating the Passport Pocket
4/17/2016 11:19:00 PM

Welcome to Post #2 - Sewing up the EASY passport pocket.
If you have just joined us, Lindsay and I are sewing up some projects found in our book On the Go Bags, and this sew along is for the Airport Sling bag. Join us in the On the Go Bags Facebook group, to join the sew along fun and chat with other participants!
If you have missed a post in the sew along, here are the previous posts:
- Post #1: Supplies, Cutting & Interfacing
In this edition of the Airport Sling sew along, we will be focusing only on pages 112 -115 in the book. We'll work on the exterior pocket pieces, and install the entire pocket in the back exterior panel. When we are done, it will look like this:

I've made an amazingly helpful and professional looking video to help you know which pieces you will need for this section:
Wasn't that amazing? And helpful?
While I am going to go into a lot more depth in the sew along, I can't go through the whole process and writing out the instructions from the book here. That would probably make my publishers a bit cranky. So I'll give you some tips that will help you with success, but you'll still need to refer to that book!
Page 112, Make the Card Slots Pockets:
We'll start with making the credit card slot pockets. The best advice I can give you for being successful with the slot pockets is to double-check your measurements - and check them again.
You will mark the lines, as provided onto the WRONG SIDE of the card slot piece. The last measurement at 3 3/4" is not really required, so don't worry about that. When you get started folding, make sure that your 16" long strip of fabric is RIGHT SIDE up. Take the right side edge of the strip and fold it to the left as shown in illustration B, at the bottom of page 112. I am wondering if you need a video for this? If you don't get this, please let me know and maybe I can do a new video for this - I'm all about the videos right now.
The instructions at the top of page 113 for topstitching the top edges the card slots and basting them in place are pretty clear. So follow these and then move on to Step 5 where you are stitching the 1 5/8" x 5 fabric strip to the left side, and the wider 2 1/2" piece to the right side. (When I got here I realized that the instructions have them listed as 5" x 1 5/8" & 5" x 2 1/2": height x width, and they should be opposite that: width x height. That is totally my fault, and I never caught it in editing either.)
Before I continued onto Step 6, I decided to add some topstitching onto the left strip because the right side will be stitched in this way when we create the pen slip pocket, and I want my left side stitching to match the right. So after Step 5, I topstitched in the ditch on the left side of the cart slots and also 1/8" over from the seam line. You can see that topstitching below:
Continue on completing steps 6 & 7, sewing the 7 1/8" x 5" piece to the back side of the unit you completed, above, and then in Step 8 you will pin it on top of one of your lining pieces like this:

In Step 8 you baste the pocket in place along the bottom, left, and right sides. You'll also create the pen slip pocket by sewing in the seam ("in the ditch") on the right side of the card slot pockets and then topstitching again 1/8" to the right of the seam. Now it will look like this:

Here's a closer look - I love topstitching:

Page 114, Attach the Zipper Pocket:
After you sew the open end of your zipper closed, you will follow Step 1 to add the zipper end strips. Here is what they looked like pinned on, but you could also use some glue or wash away tape to hold them in place:

Here I've done the topstitching, you might need to use your zipper foot for this so that you don't hit the metal starts/stops:

Important! In Step 2 you need to find the centre of the zipper and the passport pocket pieces, mark these now, and you will see why very soon!
At Step 3, we are ready to add the zipper to the EXTERIOR pocket piece. It says this in the instructions, but looking at the illustration, it could be unclear. (You may notice that I have attached a metal bag label to the exterior pocket piece. You can put one wherever you choose, or not at all, but if you do want to add one here is the tutorial.)
When you place the zipper in place, the zipper should be WS up. So when you lay the zipper on the pocket, the pull will be on the left when the zipper is closed. Match the centre mark on the zipper and top of exterior pocket. Tip: I find it easiest to have the zipper open because it will lay a lot flatter. Pin the top centre and then bottom corners first. Pin up the straight sides and then pin the zipper down around the top curves last. I never had to clip my zipper to make it fit, but if you really can't get it to meet up with the fabric edges, you could put little 1/8" snips in so that it will stretch around the curve - I don't think you will need to though!
You could use double-sided tape with this, it works okay, but I tend to get it stuck everywhere when I am working on a curve and get all frustrated, so I stick with pins. I'll show you a pin trick in a second!
So this is how it looks pinned. Notice the zipper right side down.

Here's a closer look at the left side:

Here's a closer look at the right side:

And here is a close up of my pin trick. Are you seeing the trick? Take a wee stitch with the pin, and instead of leaving the end of the pin poke up and lay over the zipper at a weird angle, go back down through the fabric BEFORE the zipper chain and come up on the other side. Your pins will lay nice and flat this way.

Page 115, we are already on page 115!
At Step 4, I am instructing you to pin your lining piece (the one without credit card/passport pocket) wrong side up over this before you sew, but this would be a lot easier if you didn't have to deal with pins and if the zipper were already basted in place. So switch to your zipper foot and using 1/8" seam allowance baste the zipper in place.

So now…. you can follow Step 4 and place the lining over top and pin or clip in place. Why am I clipping here instead of pinning? I am weird I guess. I like to pin when I want to be sure there is no sliding, and clip when I am not too worried or when something is basted. Sometimes I just use whatever my hands grab at the time.

In Step 5 we will be using your full 1/4" seam allowance to sew all of the layers together.

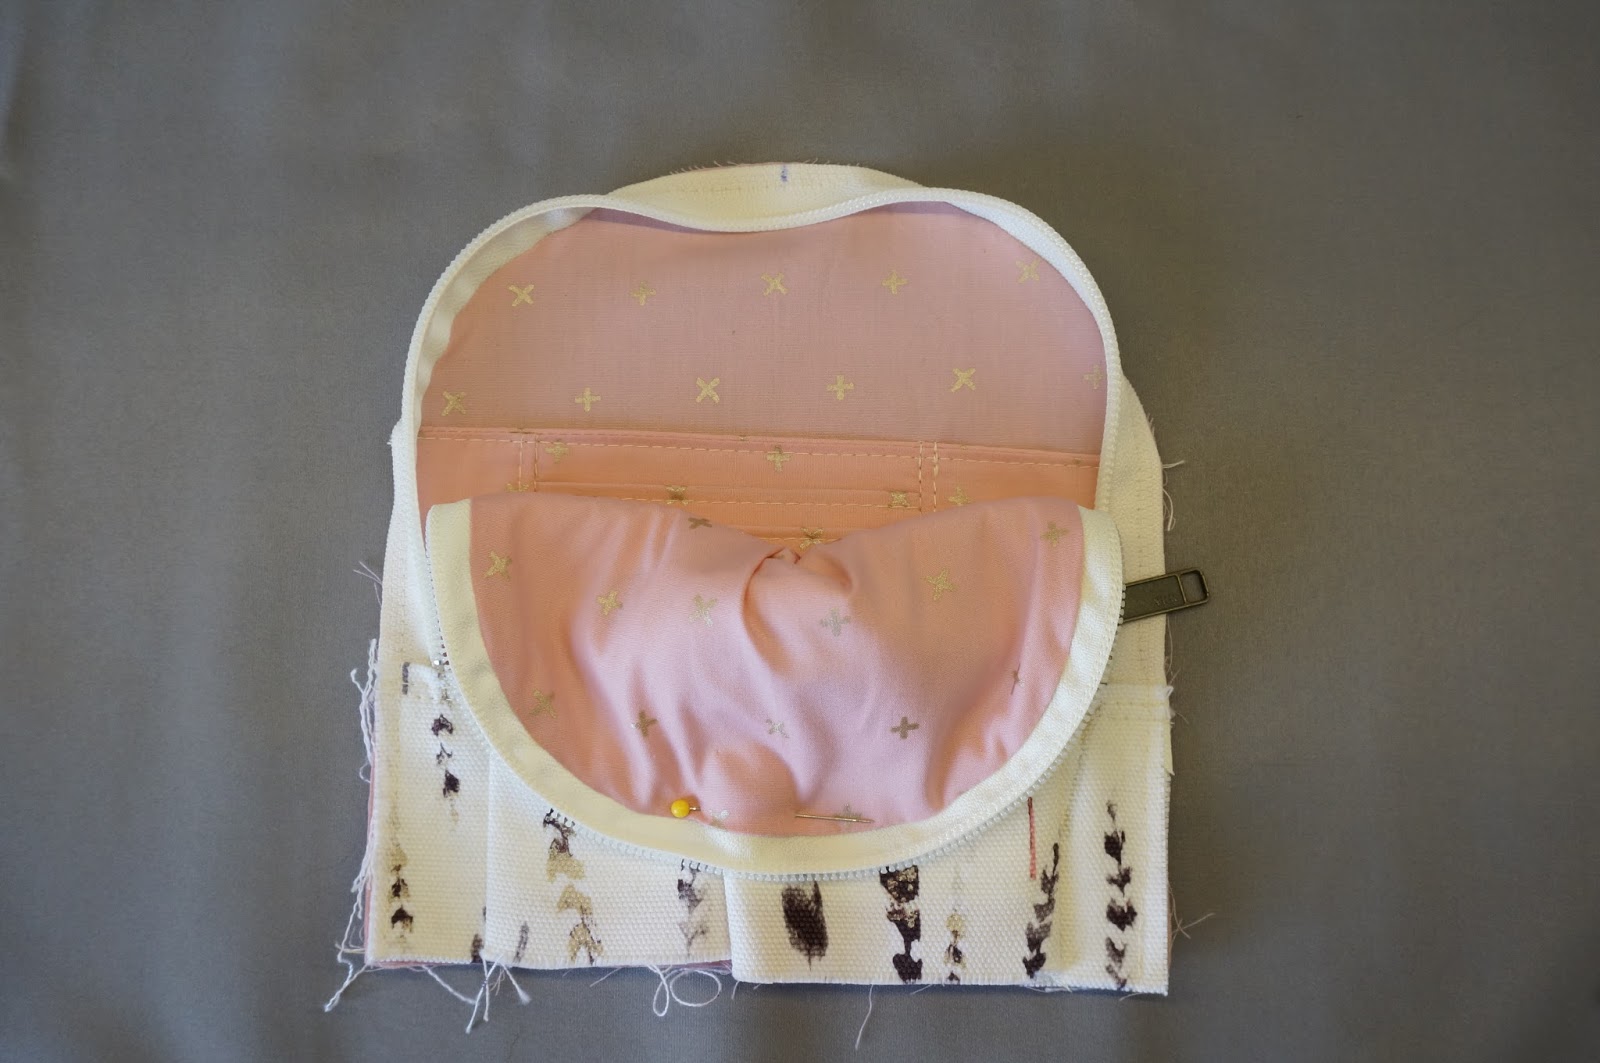
After it's stitched, turn the pocket right side out and press the seam flat on both sides. This is what it will look like from the back (somebody could of pressed it a little better):

And here is what it looks like from the front:

At Step 6 you are going to place this completed unit on top of the remaining lining piece (the one with the credit card/passport pockets). This is going to be easiest if you open up that zipper and pin that flap out of the way.

Use a seam allowance of 1/8" or slightly less than 1/4" to stitch that zipper down onto the pocket. Looks good!

Alright, there is really only a couple more steps to this section of the instructions, so you are almost done! Working on Step 7, you need to make sure you read the HINT box on the right side of the page. the hint box actually has some important information here ;-)
Step 7 tells you to clip tiny notches in the curve, and you can see those in the photo below because I have put them on with ink pen first. Basically, make snips about 1/2" apart into the curve.

Step 7 also says, "with right sides together, secure the inside curve of the exterior panel to the zipper edge." How the heck do you do that? First match the top of the curve on the "n" shaped piece, to the top of the curve on the pocket. Pin in place at centre.

Then pull the bottom corners of the "n" down to meet the bottom corners of the passport pocket and pin them in place.

Now you can start pinning or clipping the curve in place. Because you have clipped the curves, the fabric should ease into the corners as you pin around. I like to do the straight sides first then alternate clipping the top and bottom until they meet in the middle. Alright, stitch around that baby and press it as described in Step 8.

Last step!!
You need to baste across the entire bottom anchoring all of those layers together. The instructions tell you to create a pleat by folding the zipper ends together. To do this, fold the zipper end in half, clip together and sew across them to baste. That looks like this:

That concludes my second post in the sew along. I'll be watching the facebook group to see all of your Airport Slings in construction. If you have any photos and questions, feel free to ask them there.
In our next post we will make and attach the slip pocket and work on the Exterior bag shell. I'll be posting on Friday, April 22, 2016.
Thanks for reading!

I've made an amazingly helpful and professional looking video to help you know which pieces you will need for this section:
Wasn't that amazing? And helpful?
While I am going to go into a lot more depth in the sew along, I can't go through the whole process and writing out the instructions from the book here. That would probably make my publishers a bit cranky. So I'll give you some tips that will help you with success, but you'll still need to refer to that book!
Page 112, Make the Card Slots Pockets:
We'll start with making the credit card slot pockets. The best advice I can give you for being successful with the slot pockets is to double-check your measurements - and check them again.
You will mark the lines, as provided onto the WRONG SIDE of the card slot piece. The last measurement at 3 3/4" is not really required, so don't worry about that. When you get started folding, make sure that your 16" long strip of fabric is RIGHT SIDE up. Take the right side edge of the strip and fold it to the left as shown in illustration B, at the bottom of page 112. I am wondering if you need a video for this? If you don't get this, please let me know and maybe I can do a new video for this - I'm all about the videos right now.
The instructions at the top of page 113 for topstitching the top edges the card slots and basting them in place are pretty clear. So follow these and then move on to Step 5 where you are stitching the 1 5/8" x 5 fabric strip to the left side, and the wider 2 1/2" piece to the right side. (When I got here I realized that the instructions have them listed as 5" x 1 5/8" & 5" x 2 1/2": height x width, and they should be opposite that: width x height. That is totally my fault, and I never caught it in editing either.)
Before I continued onto Step 6, I decided to add some topstitching onto the left strip because the right side will be stitched in this way when we create the pen slip pocket, and I want my left side stitching to match the right. So after Step 5, I topstitched in the ditch on the left side of the cart slots and also 1/8" over from the seam line. You can see that topstitching below:
 |
| Stitch "in the ditch" on the left side of the card slots, and 1/8" past the seam. |

In Step 8 you baste the pocket in place along the bottom, left, and right sides. You'll also create the pen slip pocket by sewing in the seam ("in the ditch") on the right side of the card slot pockets and then topstitching again 1/8" to the right of the seam. Now it will look like this:

Here's a closer look - I love topstitching:

After you sew the open end of your zipper closed, you will follow Step 1 to add the zipper end strips. Here is what they looked like pinned on, but you could also use some glue or wash away tape to hold them in place:

Here I've done the topstitching, you might need to use your zipper foot for this so that you don't hit the metal starts/stops:

Important! In Step 2 you need to find the centre of the zipper and the passport pocket pieces, mark these now, and you will see why very soon!
At Step 3, we are ready to add the zipper to the EXTERIOR pocket piece. It says this in the instructions, but looking at the illustration, it could be unclear. (You may notice that I have attached a metal bag label to the exterior pocket piece. You can put one wherever you choose, or not at all, but if you do want to add one here is the tutorial.)
When you place the zipper in place, the zipper should be WS up. So when you lay the zipper on the pocket, the pull will be on the left when the zipper is closed. Match the centre mark on the zipper and top of exterior pocket. Tip: I find it easiest to have the zipper open because it will lay a lot flatter. Pin the top centre and then bottom corners first. Pin up the straight sides and then pin the zipper down around the top curves last. I never had to clip my zipper to make it fit, but if you really can't get it to meet up with the fabric edges, you could put little 1/8" snips in so that it will stretch around the curve - I don't think you will need to though!
You could use double-sided tape with this, it works okay, but I tend to get it stuck everywhere when I am working on a curve and get all frustrated, so I stick with pins. I'll show you a pin trick in a second!
So this is how it looks pinned. Notice the zipper right side down.

Here's a closer look at the left side:

Here's a closer look at the right side:

And here is a close up of my pin trick. Are you seeing the trick? Take a wee stitch with the pin, and instead of leaving the end of the pin poke up and lay over the zipper at a weird angle, go back down through the fabric BEFORE the zipper chain and come up on the other side. Your pins will lay nice and flat this way.

Page 115, we are already on page 115!
At Step 4, I am instructing you to pin your lining piece (the one without credit card/passport pocket) wrong side up over this before you sew, but this would be a lot easier if you didn't have to deal with pins and if the zipper were already basted in place. So switch to your zipper foot and using 1/8" seam allowance baste the zipper in place.

So now…. you can follow Step 4 and place the lining over top and pin or clip in place. Why am I clipping here instead of pinning? I am weird I guess. I like to pin when I want to be sure there is no sliding, and clip when I am not too worried or when something is basted. Sometimes I just use whatever my hands grab at the time.

In Step 5 we will be using your full 1/4" seam allowance to sew all of the layers together.

After it's stitched, turn the pocket right side out and press the seam flat on both sides. This is what it will look like from the back (somebody could of pressed it a little better):

And here is what it looks like from the front:

At Step 6 you are going to place this completed unit on top of the remaining lining piece (the one with the credit card/passport pockets). This is going to be easiest if you open up that zipper and pin that flap out of the way.

Use a seam allowance of 1/8" or slightly less than 1/4" to stitch that zipper down onto the pocket. Looks good!
Alright, there is really only a couple more steps to this section of the instructions, so you are almost done! Working on Step 7, you need to make sure you read the HINT box on the right side of the page. the hint box actually has some important information here ;-)
Step 7 tells you to clip tiny notches in the curve, and you can see those in the photo below because I have put them on with ink pen first. Basically, make snips about 1/2" apart into the curve.

Step 7 also says, "with right sides together, secure the inside curve of the exterior panel to the zipper edge." How the heck do you do that? First match the top of the curve on the "n" shaped piece, to the top of the curve on the pocket. Pin in place at centre.

Then pull the bottom corners of the "n" down to meet the bottom corners of the passport pocket and pin them in place.

Now you can start pinning or clipping the curve in place. Because you have clipped the curves, the fabric should ease into the corners as you pin around. I like to do the straight sides first then alternate clipping the top and bottom until they meet in the middle. Alright, stitch around that baby and press it as described in Step 8.

Last step!!
You need to baste across the entire bottom anchoring all of those layers together. The instructions tell you to create a pleat by folding the zipper ends together. To do this, fold the zipper end in half, clip together and sew across them to baste. That looks like this:

That concludes my second post in the sew along. I'll be watching the facebook group to see all of your Airport Slings in construction. If you have any photos and questions, feel free to ask them there.
In our next post we will make and attach the slip pocket and work on the Exterior bag shell. I'll be posting on Friday, April 22, 2016.
Thanks for reading!
Janelle
Please like our sponsors on Facebook!

Aurifil * Blend Fabrics * ByAnnie * C&T Publishing * Craftsy * Pellon * Riley Blake Designs


2 comments
Nice to see how to make bags. It helps women who want livelihood by this in many developing countries. For branded bag, someone can visit branded bags from FZillion.com .
ReplyDeleteUSA free shipping and 75 days free return policy.
Love the video :)
ReplyDeleteNote: Only a member of this blog may post a comment.