


.jpg)
EB-FUSE • EMMALINE BRAND INTERFACING

FUSIBLE • WOVEN • 100% COTTON
I am so excited to introduce our own Emmaline brand interfacing - EB-Fuse! Yay! I have wanted to do this for a long time, and am so happy the time has finally come!
We have 3 weights of all purpose, woven, fusible, interfacing suitable for a range of weights of cotton, wool, or knit fabric. These work very well to stiffen and add structure to quilting cottons for exterior/interior bag outers & linings, pockets, or garments. Use it on our woven wool "Harris Tweed" fabrics to stabilize before cutting, or on our faux leather to remove stretch. For a heavier/stiffer feel on cottons, or heavier fabric weights, try the medium & heavy weights. See below for a more detailed description on these weights.
We even have FREE sample packs!!
Check out the video for a complete run down and review!
CHOOSE FROM 3 DIFFERENT WEIGHTS:
- Light - 120 gsm - For use on quilting cotton for exterior bag outer, interior lining, pockets, or garments. This is a similar weight to Pellon SF101 or Vilene G700. Use it on our woven wool "Harris Tweed" fabrics to stabilize before cutting, & on our faux leather to remove stretch.
- Medium - 160 gsm - Gives you a slightly stiffer feel than our Light weight version. Great to use on credit card pockets, wallets and bag exterior fabrics.
- Heavy - 210 gsm - This has a similar weight and feel to Decovil Light stabilizer, without the cost! It adds a very effective stiffness to add structure to a bag exterior, but still has a nice fabric feel.

"Just received my latest hardware/fabric/interfacing order and can't believe how much I LOVE the EBFuse light woven interfacing....It beats the heck out of the SF101 and others I have tried. The feel of the adhesive on the back takes away any confusion of right side/wrong side....happy iron in my sewing area now!! The support it gives my fabric (both cotton and a med. weight home decor product) is perfect in this 1st project using it!! And my old arthritic hands can EASILY fuse it as well. I have a habit of ripping my interfacing to fit straight edged pattern pieces and this product makes it so simple to do. It stays nicely squared with no excess threads in the way, as happens with others. Cuts way down on the strain of cutting on my hands with either scissors or blades. Thanks so much for this lovely new product Janelle MacKay!! It is amazing."- Barbara H.

I hope you like using our EB-Fuse as much as I do. I have really enjoyed working with it!
Stay tuned for more fun projects & products we have coming up!!
Janelle xo
Our beautiful script bag labels now also come in our favourite finish, Iridescent Rainbow. I've put together a quick installation video so you can see how easy they are to install.
They are so easy!
Shop HERE for Metal Bag Labels.
Thanks for reading!
Janelle
They are so easy!
Shop HERE for Metal Bag Labels.
Thanks for reading!
Janelle
Bag Making Supplies
How to Attach Strap Anchors - A Hardware Installation Tutorial
8/13/2016 04:58:00 PM
Hey Bag Makers! We've got some great new strap attachments in the hardware shop at emmalinebags.com, and Cyndi from The Nosy Pepper is going to run you through this easy tutorial so you can see how easy they are to apply. The strap anchors come in either shiny nickel or gold finish and are available on our website: HERE


The Edgwena Strap Anchors are a great way to add some bling to your bag and are super easy to install. Sew up your bag as you normally would (minus adding the straps of course) and install the strap anchors at the very end of making your bag. Normally, adding new pieces of hardware at the end stresses me out, but these are so super easy to install. So much easier and quicker than having to add fabric tabs to your bag.
Important: make sure that you reinforce the area that you will be attaching your strap anchors to. I used flex foam on the exterior of the bag, which gives a bit of support (and bulk) so I just added a few layers of woven interfacing on the lining side of my bag. If you plan on only using fabric without any kind of stabilizer, consider adding some peltex to give the screws something to bite into without adding stress to your pretty fabric.
Once you have completed your exterior, gather your Edgwena Strap Anchors, the itty bitty screws, some fray check, a marking pen and a small Phillips screwdriver (I used one that came to change batteries in toys).
Mark where you want your Edgewenas to sit on the top of your bag:

The easiest way is to find your centre point of the bag top and then measure away to both the left and right of centre. Once you are happy with your placement, use your marking pen to mark where you want them:

Now the fun part. Slide your Edgwenas on and make a mark to denote the screw holes on the lining side of your bag:

Once you have marked your fabric, get your awl out and punch through the lining fabric and into the stabilizer below (***be careful you don't punch all the way through to the exterior, you don't need to go that far***) Add a drop of fray check into your holes.
 Once you have your “pilot hole” slip your Edgwena back on and grab your screw driver and your baby screws. Those buggers are slippery so I found out the best way is to just grab one out of the bag at a time (don't make the same mistake I did!)
Go slowly, these tiny screws strip out really easily. It's easier if you start to screw it in a couple turns then slide it back on your bag, taking care to line the hardware up with your “pilot holes”. They have to be set in just so or else they cause you to want to say bad things as you unscrew them for the fourth time.


Now that your Edgwenas are all in place, we need to make some straps!

How to Attach our Edgwena Strap Anchors

The Edgwena Strap Anchors are a great way to add some bling to your bag and are super easy to install. Sew up your bag as you normally would (minus adding the straps of course) and install the strap anchors at the very end of making your bag. Normally, adding new pieces of hardware at the end stresses me out, but these are so super easy to install. So much easier and quicker than having to add fabric tabs to your bag.
Important: make sure that you reinforce the area that you will be attaching your strap anchors to. I used flex foam on the exterior of the bag, which gives a bit of support (and bulk) so I just added a few layers of woven interfacing on the lining side of my bag. If you plan on only using fabric without any kind of stabilizer, consider adding some peltex to give the screws something to bite into without adding stress to your pretty fabric.
Once you have completed your exterior, gather your Edgwena Strap Anchors, the itty bitty screws, some fray check, a marking pen and a small Phillips screwdriver (I used one that came to change batteries in toys).
Mark where you want your Edgewenas to sit on the top of your bag:
The easiest way is to find your centre point of the bag top and then measure away to both the left and right of centre. Once you are happy with your placement, use your marking pen to mark where you want them:
Now the fun part. Slide your Edgwenas on and make a mark to denote the screw holes on the lining side of your bag:
Go slowly, these tiny screws strip out really easily. It's easier if you start to screw it in a couple turns then slide it back on your bag, taking care to line the hardware up with your “pilot holes”. They have to be set in just so or else they cause you to want to say bad things as you unscrew them for the fourth time.
Now that your Edgwenas are all in place, we need to make some straps!
I made 1” wide straps, but ¾” would also work nicely. Go through the tedious process of fusing, pressing and stitching your straps:

Once they are done, just attach them through Edgewena’s loop and stitch them down like you would any with any other ring.


And you're all done! Easy peasy and so much quicker than making strap tabs. They look so professional and add a class to any bag.


Here's my gorgeous new cork bag with it's lovely straps, and seriously, this took no time at all.

We'd love to see the beautiful and imaginative ways you have used your Edgwena Strap Anchors too! Please share your photos in our facebook group "Emmaline Sewing Patterns Group", as well as tag us on instagram with @emmalinebags and hashtags #emmalinehardware #emmalinebags. We love to see your work!
Thank you for reading,
Janelle & Cyndi

Once they are done, just attach them through Edgewena’s loop and stitch them down like you would any with any other ring.
And you're all done! Easy peasy and so much quicker than making strap tabs. They look so professional and add a class to any bag.
Here's my gorgeous new cork bag with it's lovely straps, and seriously, this took no time at all.
We'd love to see the beautiful and imaginative ways you have used your Edgwena Strap Anchors too! Please share your photos in our facebook group "Emmaline Sewing Patterns Group", as well as tag us on instagram with @emmalinebags and hashtags #emmalinehardware #emmalinebags. We love to see your work!
Thank you for reading,
Janelle & Cyndi

Good Morning!
If you are shopping on our website this morning, you may have noticed a couple of changes. We are pretty excited about them!
The most obvious change for you will be the reminders that pop down for you to buy 5, 10 or 15% when you shop. You'll be informed of how much you need to spend to get to the next discount level, and you will be notified of which discount code to use! Cool!
Our customers had a couple of recurring issues on our website:
We are always trying to improve our processes at Emmaline, and keeping up with the demands and the times is an ongoing process.
If you have any questions, please ask!
Get a 50% discount on my Craftsy class AND an opportunity to win $1000 for a craft-focused charity of your choice. There are only a few more days left to enter. How to enter? That's simple, just purchase a class before the 13th!!
New to Craftsy? Just so you know, there is no risk, because if you aren't happy with my class, you get a full refund. GO TO THE CLASS & WATCH THE OFFICIAL VIDEO TRAILER
Thank you for reading,
Janelle
If you are shopping on our website this morning, you may have noticed a couple of changes. We are pretty excited about them!
The most obvious change for you will be the reminders that pop down for you to buy 5, 10 or 15% when you shop. You'll be informed of how much you need to spend to get to the next discount level, and you will be notified of which discount code to use! Cool!
Our customers had a couple of recurring issues on our website:
- We heard that you can't remember or find discount codes, so now they will be posted for you at the top of the page when you are eligible.
- We heard that you can't see the drop down arrows to choose quantities, so we have removed the extra quantities and fixed up our arrows.
- We heard that you don't want to order 10 to get a savings, so we have made it so you can buy how many you choose and still get a discount.
We are always trying to improve our processes at Emmaline, and keeping up with the demands and the times is an ongoing process.
If you have any questions, please ask!
-----------------------------
Get a 50% discount on my Craftsy class AND an opportunity to win $1000 for a craft-focused charity of your choice. There are only a few more days left to enter. How to enter? That's simple, just purchase a class before the 13th!!
New to Craftsy? Just so you know, there is no risk, because if you aren't happy with my class, you get a full refund. GO TO THE CLASS & WATCH THE OFFICIAL VIDEO TRAILER
Janelle
UPDATED!!
The Retreat Bag is now available in 2 Sizes!! Please hop over to
THIS POST to read all about it and see new pictures!!

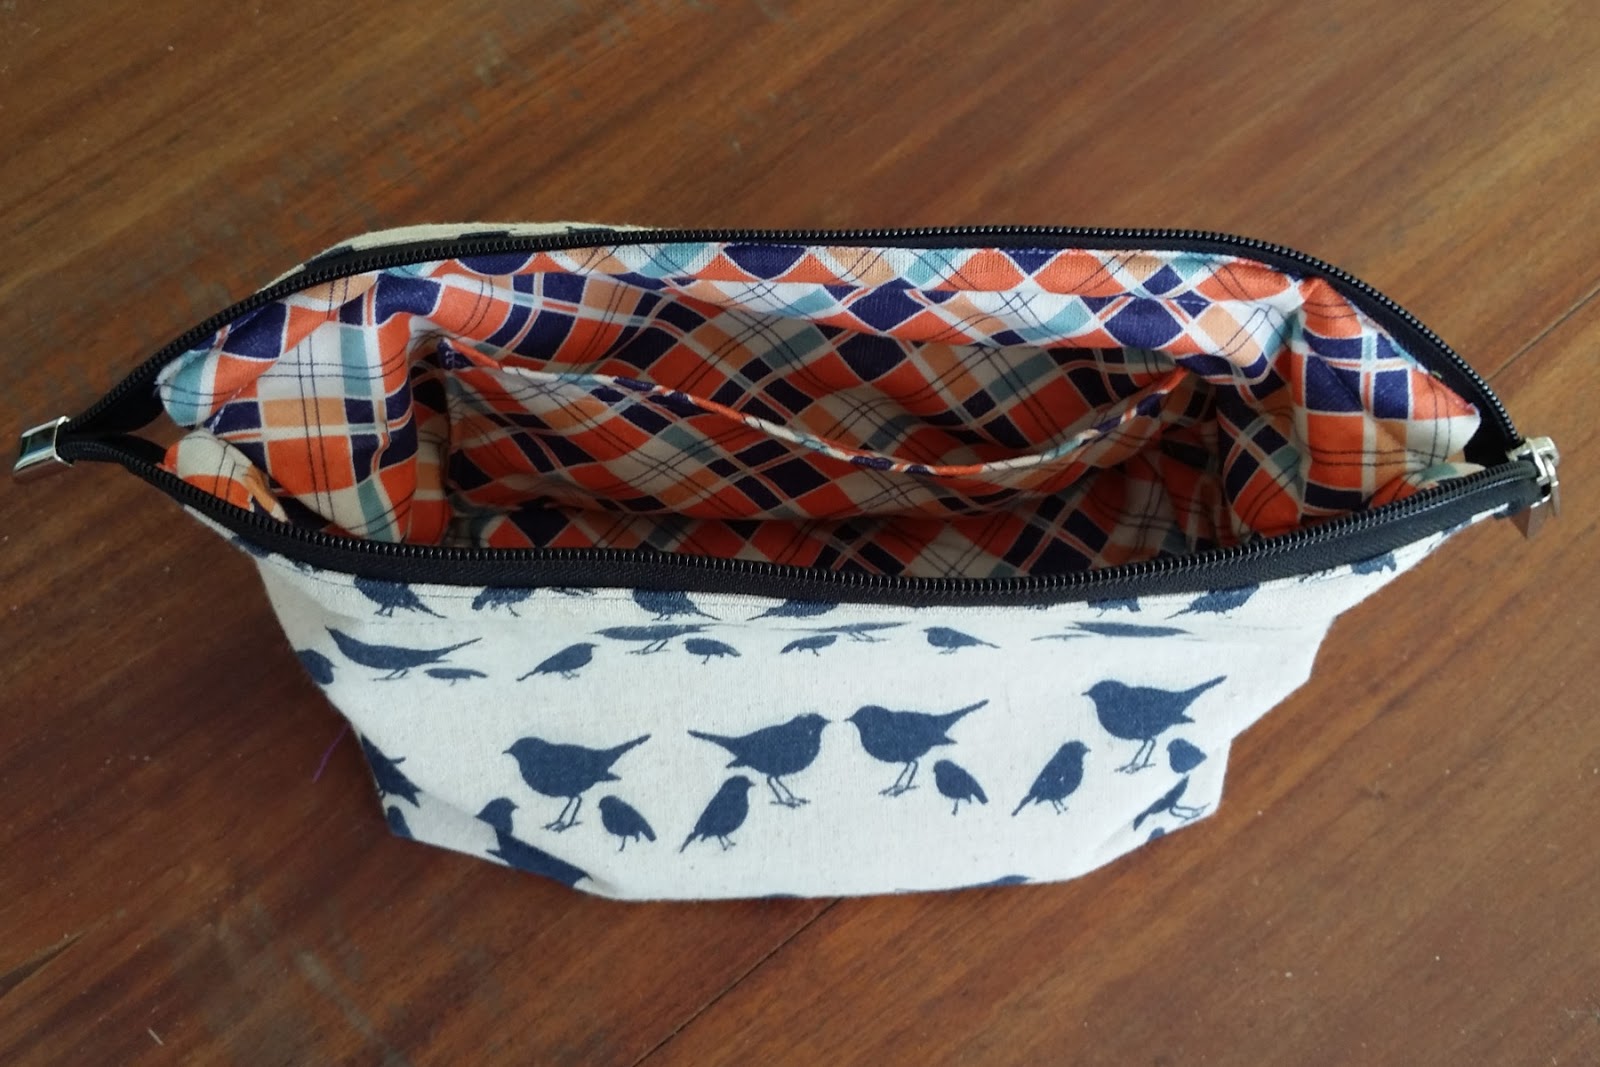
This cute boxy looking pouch is a gem! I am so pleased with how these turn out. It's just perfect for any retreat, or gift, or swap bag, or make-up bag, or wet bag, or shaving bag, or pencil bag, or toy bag…. did I say sewing bag?

The Retreat Bag is a simple zippered pouch with a wide base and a wide structured opening. There is a casing in the top where you insert two wire frames (one on each side), which helps it stay open when open, and helps turn the corners down when closed. It has two optional slip pockets inside and a long zipper that helps it open wide.


 |
| by Ellen Wiedman |
The girls at the 2015 NCW Retreat in NSW (yet to be blogged about) tried it out first and then helped me name it. Here are some of their photos!!
 |
| by Danielle from Paisley Avenue |
 |
| By Andrea from Bubs by Andie |
 |
| by Ellen Wiedman |
 |
| by Jodie from Three Little Chickens |
Simone added some of my cute metal zipper ends to her bag. I think they make an awesome addition!
You can find the Zipper Ends HERE.
 |
| by Simone Symonds |
 |
| by Simone Symonds |
 |
| by Nyssa Lesniak |
 |
| by Melisa from Melisa Jane Handmade |
 |
| by Melanie from Buntings & Things |
 |
| by Kristina Hambly |
 |
| By Cynthia Phillpotts |
 |
| By Cynthia Phillpotts |
 |
| by Gail Newman |
In these two pictures below, Simone has used some oilcloth and left the pockets out to make a wet bag! Perfect for traveling.
 |
| by Simone Symonds |

After I instructed them on how to make it, and promising to write a tutorial for it, I came home to Canada refreshed and retreated (actually very jet lagged) and made a few minor changes. Changing the way the zipper is constructed and the wires are put in helps it keep it shape a bit better and fold down nicer at the top.

(Scroll down to the bottom of the page)
If you haven't joined the Emmaline Facebook pages yet, please do so to stay up to date on the latest tutorials, patterns and bag hardware.
Here they are:
Emmaline business page and
Emmaline Sewing Patterns Group - fun Facebook group for chat, help and inspiration
Bag Making Tutorials
Script Labels are Here: How to Install Instructions Included
8/11/2014 11:30:00 AM
I am very excited to share my script labels with you. I designed these early last year, and it's been a long wait for them to arrive. So happy to have them available for your bags now!!

Finished in shiny nickel, and featuring the word "Handmade" in a classy retro style script font. This label brags that handmade is chic, and handmade can indeed be professional looking. Brag about your bag!! See how easy they are to install:
Finished in shiny nickel, and featuring the word "Handmade" in a classy retro style script font. This label brags that handmade is chic, and handmade can indeed be professional looking. Brag about your bag!! See how easy they are to install:
If you follow along here, or have purchased one of my patterns, you have probably heard me mention DST (Double-Sided Tape) a few times before. Yes... I love it! It's one of my fave sewing notions. Today I thought I would show you just where and when I use this handy stuff when I'm constructing my bags, wallets & totes. I'll show you why I love it so much.
Handbag Hardware
Made in the USA & Made in Canada Labels are here!! Which do you like?
2/19/2014 12:27:00 PM
My new metal bag labels and zipper pulls are in the shop and getting a great response from customers so far. I am really happy with how they turned out. These will be great as a centre focal point on the exterior of any bag, or a nice professional surprise in a lining. I know I am biased, as they are my design, but I really think these labels and zipper pulls will set your handmade bags apart from the rest. They are just cool, cool, cool and I am very proud of them! I love my bag bling...


I wanted to use the word "handcrafted" and have a wider & larger label than my original versions and so after some messing around, I came up with this design. I couldn't decide on whether or not to put black in in the lettering, so I got both. You see, I have a hard time making decisions. I plan on re-ordering the style that is the most popular and probably will not always carry both the designs with ink them and no ink in them. As it turned out, it's actually hard to see a huge difference in the "with ink" or "without" as the lettering itself is not very thick. If I had made the font a little wider, I think it would be much more noticeable. So please let me know your preference and I'll make note.

Being a Canadian girl, I started with the Made in Canada version, and created a maple leaf zipper pull to match. After designing the Made in the USA version, I decided on a simple zipper pull to match that says "handcrafted". These pulls are thinner, but a bit longer than the original "handmade" pulls and are well suited for both the exterior, interior of bags, zipper pouches, make-up bags and jackets. I like the size of these!


My Australian customers are feeling a bit left out at the moment and several have requested I produce some Made in Australia labels and if I get a big enough response, I will go for it. My biggest worry is that I don't sell a lot to AUS because of the shipping costs and so I really have to make sure they will be a popular item. I would definitely only buy one style - with ink or without.
These go in very easily. Just simply use the washer to mark the two slits that need to be made. Put the label prongs through the holes, place the washer on the back and bend the prongs over the washer. I recommend a bit of batting, felt or fleece over the prongs before you put the washer on, as this makes a tighter fit.
So let me know please - which is your preference? With Black ink or Without?


