
Make Your Own Vinyl/Leather Look Handbag Straps - A Tutorial
2/25/2012 11:06:00 PM
How awesome do these faux leather vinyl handbag straps look?
 |
| The Emmaline Bag with 1" handbag straps. |
If you want to make some great leather look straps from vinyl that don't show raw edges and messy threads, keep on reading because I can show you how. They are super easy to make and they turn out so good. I must say, I'm loving them. Recently, I took one of my bags down to the local quilting shop and the ladies working there marveled over my handles and thought they were real leather. If it sounds like I'm tooting my own horn here, I apologize, but I guess I am! If you need a bag to try them out on, you can put these straps to use on my new ePattern, The Emmaline Bag, available in the shop HERE.
 |
| The Emmaline Bag with 1.5" handbag straps. |
A few months ago I was making a handbag from a pattern that called for premade leather straps, and after looking around, I found that they were either really cheap looking, really expensive or available only by order and had a huge wait for delivery. Now I am a really impatient person, so waiting for a strap delivery when I wanted to make my bag RIGHT NOW wasn't going to work. So I went down to my local Spotlight (fabric and craft store) and found some gorgeous soft, leather look, vinyl called Utopia and away I went. They didn't turn out great at first, because I had to figure out how to hide those raw edges without having to turn them inside out, and I didn't want any thread ends or back-stitching showing. You can't have thick seam allowances either, but eventually, through trial and error, I worked it out and was really happy with the results.
Finding the right vinyl is key, because with the wrong stuff you won't have that great leather look and it will be really hard to sew. Remember, you aren't making a seat for the wave runner or your husband's snowmobile, this vinyl needs to be soft, pliable, and pretty thin. Stay away from the marine grade! I found mine in the upholstery section and it came in 60" widths. The back of it looks like soft woven jean in grey. It's not thin like you would make a tacky pleather 80's shirt or pants out of either and it doesn't look like plastic. (I get mine at the Online Fabric Store!)
 There are a couple of other supplies you need; you can't just go crazy with the pleather yet. Get yourself a teflon foot, they come for all makes of machines, and there are universal ones too. If you can't find a teflon foot, you can use some scotch tape under your regular foot to help make it slide across the fabric. Also, leather needles are a must. I have sewed through my vinyl with a normal needle, but only with normal thread. If you want some great topstitching, you will need some heavy duty or upholstery thread (I use Gutterman's Upholstery Thread) in both the top and the bobbin, so for this you will need the leather needle. I haven't experimented with other threads yet, but I have heard you can use a heavier quilting cotton as well. Also, You will need to get yourself some rings to match the size of handle you are making. I use shiny nickel O-rings or alloy nickel rectangular rings. I'm kind of in love with the rectangle ones at the moment. UPDATE!: You can purchase your handbag hardware in our shop HERE!
A word about tension: Tension is very important for these to turn out good. The vinyl material and heavy duty thread will definitely require you to make adjustments. Before you start on the project, sew on doubled and quadrupled vinyl with your required needle and thread and adjust your tension until the stitches look good on both the front and back. I usually end up using a 6 or 7.
 |
| Click photos to enlarge |
Let's get started:
Materials:
Teflon Presser Foot
Upholsery/heavy duty thread
Rotary Cutter/mat/ruler
binder clips, paper clips, or other clips
leather needles
vinyl (PVC, faux leather) - I get mine from OFS!
O-Rings or Rectangular Rings
Fabric tabs to go on rings.
large upholstery needle
large upholstery needle
 I am going to show you how to make a pair of 16" handles. For this you will need to cut 2 strips of vinyl that are double the length you want plus 1/2" seam allowance. So for this, cut 2 strips that are 2 inches wide x 32.5 inches long. This will give you handles 1 inch wide, but if you want handles that are 1.5 inches wide, cut your strip 3 inches wide.
  We will be using rings that are on fabric tabs as they are easier to sew into the handbag than vinyl ones. I use both methods, but for this tutorial we'll use fabric. So please prepare your rings with fabric tabs on them already. These can be added on the rings after, if you choose.
 1. Using a pen, draw a line down the exact center of the length of the strips.
2. Thread your rings onto the strips, 2 rings per bag strap. Make sure your straps are not twisted. Important!

3. Bring ends together, right sides together. If desired, clip together with clips or plastic covered saftety pins. (You can't use regular pins in vinyl because it will leave permanent holes) I have drawn on a 1/4" seam allowance (sewing line) for you to refer to, but normally I don't draw the line or clip the ends together, but I am wild like that.

4. Sew across ends using a 1/4" seam. Don't bother back-stitching.

5. Open up seam and flatten with fingers. Starting on one side, sew down opened seam allowance using a 1/8" seam.

6. When you get to the end, turn (with the needle down), sew across end of seam allowance, and then come back down the other side.

7. Sew across the other end. Clip threads. This is how it will look from the other side. (Using a long stitch)

8. Fold one edge to the drawn pen line and clip in place. You don't need to clip the whole strap, just enough to get the foot under with no problems. Using a long stitch (between 3 and 5, I use 4.5), stitch very close to the edge, (about 1/8 inch or less) all around the strap loop. You will have to slide your two floating rings out of the way as you sew.

9. This close up is to show the guides I am using. I like to line my fabric edge up on the inside edge of the little metal opening that the feed dogs come out of because it is slightly less than 1/8", but the 1/8" mark works good too. You could put a piece of tape down to use as a guide if you need to. It is VERY important that this stitching is as straight as possible, and VERY accurate. You will be stitching over this later and it has to be straight! Go slow, folding the raw edge to the pen line as you go. Putt, Putt, fold, Putt, Putt, fold.

10. When you start to get close to your starting point, STOP a few inches before you get there and put the needle down, and find your thread ends from your starting point. Grab the thread end that is on the top (side with raw edges of fabric), and pull the thread slightly. This will pull a small loop of the bobbin thread up. Use a seam ripper or large needle to pull up that loop, bringing the bobbin thread to the top side.

11. Tie off the threads together using a double knot and trim ends. This will be hidden later so you don't need to trim them too short. Continue sewing until you reach the point where you started. Snip threads and repeat Step 10 with these thread ends too. Bringing the both of the threads to this side will finish them off without having an unsightly, messy back-stitch that shows on your finished strap.

12. On the other edge, fold raw edge to meet the other at the middle, repeat sewing along edge for this side. REMEMBER to stop before you sew over your start point and pull the bobbin threads up and tie off, and then after finishing, pull up that thread and tie off too. Sew as straight and even as you possibly can.


13. After you have tied off your ends, flip the whole strap over and line up your foot so your stitching will be about 1/8" over, you will stitch a second row of stitching here for decoration (optional). I use the 1/4" mark on my base plate for a guide. You could also try it 1/4" away from your previous seam on a wider strap. Do what you like!
14. Important! As you are coming up to where you started stitching, stop sewing and pull your top thread to the back side and tie off to the bobbin thread. Then, when you meet the mark where you started, tie off those threads in the same manor. Make sure it's at the back!

15. Repeat this process for the other side.

16. Your loop should now look like this. Now we have to put the strap together in the middle with the raw edges hidden inside.


18. At the other end, do the same thing. Measure the same distance from the fold at the end as you used for the other side, I used 1.25". Put a pin in on both edges to mark the measurement. Alternatively, you could us a chalk line. Clip it together so it doesn't slide. The pins are markers to show you where to turn when top stitching, they are not holding anything together.


20. With your needle down, lift the presser foot and turn strap so you can sew along the edge. You will sew through both straps using the same long stitch you used before, exactly over the stitching line that runs along the outer edge.

21. Make sure your edges meet perfectly, use your fingers to keep the edges butted together. Sew through both sides at the same time. Your stitches might not line up perfectly on the back side, but don't worry to much about it. After do it a time or two, they will be perfect.

22. Stop when you get to the pin that is placed 1.25" from the end. Put your needle down at the pin (remove pin so you don't sew over it).

23. With needle down, lift presser foot, turn strap sideways and get ready to sew across to the other side. TRICK! If you start sewing, and your pressure foot is hanging off the back of this strap, your needle will hit your presser foot and damage them both. If your sewing machine doesn't have a fancy setting to prevent this, all you need to do is place a plastic needle case lid (as shown) under the back of the foot and over the feed dogs. Just take the lid off the needles and slide it under. As you sew, it will slide back out of the way and fall off the machine. It works awesome!

 24. A few inches before you get to your starting point, you can pull your top thread to the back by pulling the bobbin thread, and then pulling on the loop of top thread that pops through to the back. I don't always do this.
 25. When you get to the spot where you started, drop the needle, lift the presser foot, turn, and get ready to stitch across to the middle. Don't forget to place the needle case lid under the back of your foot! When you cut your threads, leave your thread long enough to thread on a needle.
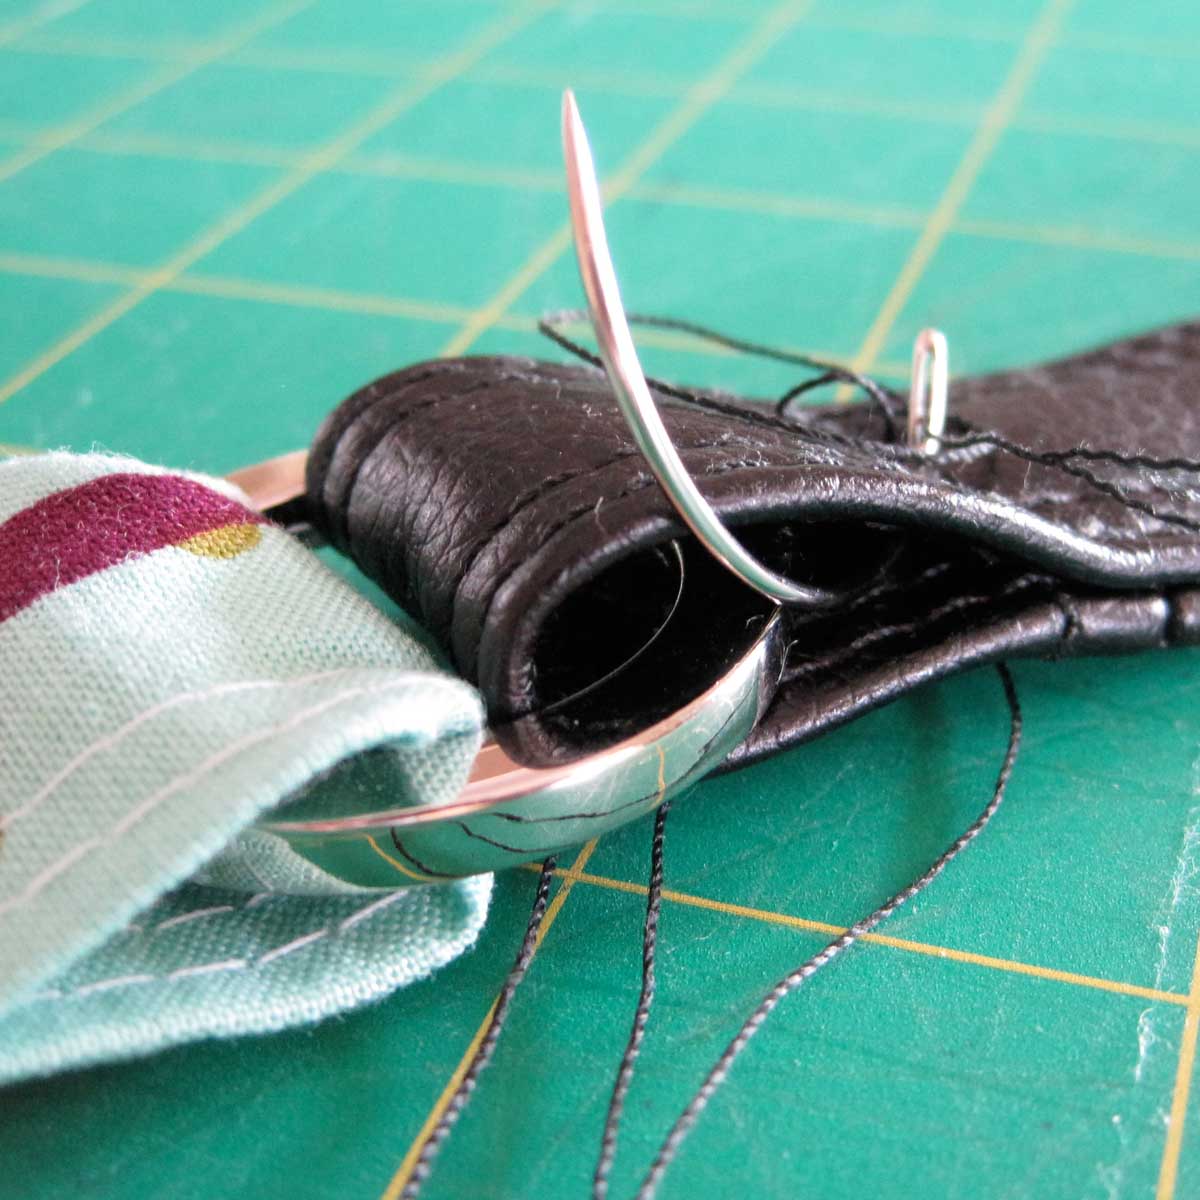
26. Use a very large, sharp needle (I like a curved upholstery needle, it is perfect) to pull your thread ends into the middle between the open ends that loop around the ring. Tie off all 4 threads firmly. If you are worried about them coming undone, you could always put a dab of craft glue over the knots. The knots should be hidden inside the vinyl loop. No thread ends showing!

27. Your strap is done and you are ready to sew your fabric tabs onto your handbag or tote in your usual way. I like to make sure that the side with the seam will be on the "wrong side" of the straps when being held, so make sure the seam is up when fastening to the bag exterior.

You are done! You can also experiment with vinyl tabs (as shown in the very first picture of this post). This is done the same way, but when you sew the strap to your handbag exterior, you will need to use a heavy needle.
Experiment with different widths, vinyl colors, thread colors and stitching widths. I think I would like to do a black strap with brown stitching very soon!
I hope you love making your own handbag straps. If you have any questions, please don't hesitate to email me, I would be glad to help.
If you have found this tutorial helpful in the slightest way, please follow my blog by either GFC, Blog-lovin, Email or signing up for my Newsletter on the right side bar. And... please share your finished bags with me in the Emmaline Bags Flickr Group. I love to see your finished Emmaline inspired projects!
If you have found this tutorial helpful in the slightest way, please follow my blog by either GFC, Blog-lovin, Email or signing up for my Newsletter on the right side bar. And... please share your finished bags with me in the Emmaline Bags Flickr Group. I love to see your finished Emmaline inspired projects!
Thank you for looking,


86 comments
Those a gorgeous bags! Thanks for the tutorial.
ReplyDeleteThank you for the compliment! Janelle
DeleteYour bags are gorgeous !
ReplyDeleteThank you so much, Justine.
DeleteI am loving the material style bags. I will have to add a leather style strap to my next Teardrop bag. Thanks for the tutorial. Well done Janelle! :)
ReplyDeleteTeresa, a leather look strap would be great on the Teardrop Bag. I'm going to have to do one too! Janelle
DeleteThank you so much for sharing this tutorial - great job!
ReplyDeleteLove for you to share it at my "Made by ME" Linky Party Wednesdays :)
http://www.jaqsstudio.com/2012/02/made-by-me-20-linky-party.html
Thank you, Q! Love your fabric shop too. I'm all linked up. Thx Janelle
DeleteThank you, Lindsi! I will hop over and have a look. Janelle
ReplyDeleteGreat tutorial.. I am pinning and sharing on FB..
ReplyDeleteThanks for linking up at Friday Fun Party
Hani
craftionary.net
Thank you for pinning and sharing. That is awesome!
DeleteI love the fabric and TFS the tute!! Stopping by from Cereative Itch Linky Party.
ReplyDeleteHere is what I shared this week: http://craftybrooklynarmywife.blogspot.ca/2012/03/vinyl-amp-cover.html
This is great! Would the process be the same for real leather? I have some leather that I cut off the bottom of a jacket and I was thinking of using it for handbag straps.
ReplyDeleteHi Abby, I’m sure it would and I really, really want to try it but I’m scared it will hurt my machine. If you have a good machine and it’s thin leather, I think it should work. My machine sews through the vinyl like butter, but leather would be a bit different. If you try it, can you tell me how it goes? Thank you, Janelle.
Deleteyeah, I'm a bit chicken too. I think I'll have to dig out my Mums old pfaff...that thing sews through anything! If I try it I'll definitely let you know.
DeleteThanks for the tutorial! I have been trying to find a great tutorial and experiment myself! I really appreciate your post on this!
ReplyDeletePinned! Thank you so much for this tutorial!
ReplyDeleteThis is such a great tutorial! I will give it a go for sure :-) Your topstitching looks so professional.
ReplyDeleteHi! everyone. I'm desperate to make some straps. I have three ,so called, candy wrapper bags that need good looking straps such as yours. I'm not a bag maker usually. Thanks for making your work available. I have no idea about links and link parties? Very nervous because I fear the quality of my work will be less than good. What do Teflon feet do ? bye for now. Craftv
ReplyDeleteHi there, the teflon foot is a presser foot you put on your sewing machine that will slide easier over the vinyl. You can ask for one at any sewing shop. I hope this helps!!!
DeleteJanelle, Thanks you so much for taking the time to write-up this tutorial. It is so helpful!! I have just gotten into sewing leather and vinyl bags and your blog/site has been very inspirational. You're amazing!
ReplyDeleteJen
Hi Jen!! I'm so glad I could help in some way. I love sewing vinyl and plan to do much more with leather too! Keep on stitching! Janelle
DeleteWOW! What a BRILLIANT tutorial, having read it all through you make it sound easy, so as soon as I get the chance I'm off to shop for suitable material to give it a try.
ReplyDeleteMany thanks.
Judi
PS LOVE, love, love, your bags!
Thanks for the tutorial. I will be using it for sure, I have just started working with vinyl for bags!
ReplyDeleteJust coming back to say I've completed a bag with straps using our method.. sooo much nicer than the way I done before... you can take a look if you want here http://nissamade.blogspot.ca/2012/10/diaper-bag-complete.html
ReplyDeleteI did have a bit of trouble sewing the vinyl although I used my walking foot attachment, can I ask what kind of machine you use, I might upgrade mine as I want to start working with faux leather more.
thanks again
Hello from Guatemala, I just found your blog, and I have to say I loved it! your bags are beautiful.
ReplyDeleteI really apreciate this tutorial... I'll try it soon. THANK YOU VERY MUCH!
Hi from Australia. Thanks for the great easy to follow tutorial. I make bags also and have been experimenting making my own handles with some success. However, you have simplified the process and given me some great tips also. I'm totally enthused to get back into my vinyl stash again. I love the bag-making fraternity, it brings us all together through our love of sewing. Thanks again. Flash Harry
ReplyDeleteWow. Nice tutorial. I'm planning to make one for myself. Hope I can make it.
ReplyDeletehttp://www.luxuryinagift.com/
While looking in my craft store for Leather Needles I found two, 130/705 90/14 and 130/705 110/18, which one should I get? I have a Brother XL-2600i. I am searching online, but haven't found the answer. Can you please help me?
ReplyDeleteHI Wandy, either one will work well. If you are using upholstery thread or thick thread, you should use the larger needle because you have to make a bigger hole for the thread to pass through. I hope this helps! Janelle
DeleteHey there and thank you so much for taking the time to make these tutorials available! I just wanted to ask how the vinyl wears? I have had one leather purse for so many years and I am a little worried that the vinyl will wear over time as did the kitchen seat covers I made with similar fabric. Thanks!
ReplyDeleteThose a gorgeous bags! Thanks for the tutorial.
ReplyDeleteborse pelle
Thanks! This tutorial really helped :)
ReplyDeleteThat's awesome! I'm so glad this strap tutorial helped you. Janelle
DeleteWhat type of sewing machine are you using?
ReplyDeleteI made this tutorial usine my old Janome home sewing machine, but I have also sewn them on my current machine, which is a Pfaff 1.5 Ambition. The vinyl sews easiet on a home sewing machine if it is a very thin vinyl. Thank you.
DeleteThis comment has been removed by the author.
ReplyDeleteThanks very much for this tutorial from a vegan! I can afford the leather and can get it locally, but for ethical reasons, really don't want to . I also abhor the cheap plastic look of many faux leathers. This is excellent.
ReplyDeleteLove the tips!! Thank you n
ReplyDeleteOhMyGoodness !!! So glad I found your blog. I'll be ordering supplies from you, thanks so much for the tutorials (I'm in Heaven looking thru your blog this afternoon).
ReplyDeleteI'm feeling the same way Wonky Girl \o/
DeleteHow does it feel to go for Candle light dinner with someone special at your favorite restaurant? Of course it feels wonderful! Add a soft feel of smooth and elegantly designed leather bag to match your perfect attire. You can opt from a wide range of Sling bags, clutches latest leather handbags available at
ReplyDeleteJunko FZE is a professional company supplying cutting-edge packaging machineries and packaging materials to clients in Sharjah and various other locations of the United Arab Emirates. We strive to offer a comprehensive range of PORTABLE BAG CLOSING , BAG MAKING MACHINES and WEIGHING SCALES materials catering to all types of packaging requirements.
ReplyDeleteamazing... love it. thank you very much for sharing.. :)
ReplyDeleteI think we must have leather sewing machine to try out this
ReplyDeleteExcellent tutorial. Thank you!
ReplyDeleteWow--I just made my first vinyl strap using your tutorial! I'm beyond thrilled! Maybe I'll try a leather one next... the only tricky part was all the pulling threads to the middle and tying them there. Thanks so much for posting this! I have several bagmaking books but none of them explained it quite this clearly!
ReplyDeleteGreat! Thanks!
ReplyDeleteI've sewn some pouches and I have been wanting to make bags for a while but always was afraid of the straps. Now I feel confident after reading your tutorial. I just have to buy a teflon foot. While I wait it to be delivered to my home I'll try the fabric strap tutorial of yours. Many many thanks for sharing Janelle. I'm feeling so coooooonfident yey \o/
ReplyDeleteSo natural and attractive all colors...
ReplyDeleteleather handbag
Thank you, great tutorial. I will be shopping your patterns sion. Beautiful bags!
ReplyDeleteYour instructions were exceedingly well written. Fabulous job! Thank you.
ReplyDeleteYour tutorial is so well written and detailed - Gives me the confidence to really go forward with confidence! Thank you for this!!
ReplyDeleteGreat collection of wonderful Leather Handbags Designs . Grabbed all the pics and I will take printout of all pictures and gift them to my sister. She is so fond of Handbags.
ReplyDeleteThank you for this! Am bookmarking it for future reference. I wish we have Spotlight where we live right now!
ReplyDeletePlease suggest me best brand for gent's wallet?
ReplyDeleteLeather Wallets
Hi...
ReplyDeleteIts just wow... The post along with the process of making the luxury fashion designers bag is just excellent...I really loved it...Thank you too much.......
Hello,
ReplyDeleteTI really liked and i appreciate your post..Its giving too much information regarding ladies clutch bags...Keep posting...Thank you too much.......
Your tutorial is fabulous! I have been making bags for a while but I just started using leather and vinyl on them. I have an issue with the bulk that you get when making the purse strap tabs that connect with the D ring or O ring. I sometimes use quilting fabrics for the body of the bag with vinyl or leather at the base of the bag so I like to use the leather or vinyl for the strap tabs and the straps. My problem comes when trying to sew the tabs (that are folded in fours) between the top of the bag and the bag facing. It's way too much bulk. Do you have any tips on how to reduce some of the bulk? Also, I use a rolling foot and a leather needle. My machine is a Brother CS6000i (which I love). It's a pretty sturdy machine. Please help if you can.
ReplyDeleteHi Loni!! I think that if you are having trouble with that, you should try to use fabric taps to attach it to the bag. Or try strips that have the raw edges folded to the back, more like a bias tape - and not in fours.
DeleteThanks for the reply! Folding like bias tape is a great idea but won't the edges fray when I use vinyl? How could I control that? I hate to ask so many questions, but any help you can give is greatly appreciated. Thanks
DeleteYes, but the will be in the centre, and not exposed. You can sew topstitching on the outside to hold them together and sew very close to the bag ring, so the ring is tight.
DeleteOh my gosh! I didn't think of that! Thanks so much! You are a lifesaver!
DeleteThis comment has been removed by the author.
ReplyDeleteIt is truly a great and helpful piece of information and nice collection.
ReplyDeletedesigner handbags and accessories
Best place to get a men's leather messenger bag?
ReplyDeletekarman
I buy from Online Fabrics often and really like them. They have several brands of vinyl....can you tell me which one you use for these handles? It's hard to tell how soft they are without touching them. Thanks.
ReplyDeleteHI Elaine, I have used the Spradling vinyl there and was quite happy. It's been a long time though, and I know that they have changed their range a bit and offer more than they used to. I hope that helps! Janelle
DeleteThank you, yes that helps. That was the one I was considering. Thanks for the quick response. I love your products and website.
DeleteIt's just lovely and informative post,
ReplyDeletehandbags
Amazing work well done Leather handbags have a great look.
ReplyDeleteSomeone shared this tutorial with me and it is great. I haven't tried it on my vinyl fabric but I have tried it on home designer fabric and my handles are amazing. Thank you!!!!
ReplyDeleteExcellent!! I am so glad that you found it useful!
DeleteI am giving you a virtual hug from Australia - brilliant. I wanted to make some decent handles on a Swoon Lola and the ones in the pattern, I think let the bag down. So will try these - thank you so much :-)
ReplyDeleteThank you! I hope you like them!
DeleteSo glad I found your blog for these handles! I just re upholstered my daughter's dining room chairs with a beautiful tan vinyl. Can't wait to make a large purse out of the fabric I have left and making the straps was my only concern! Thanks so much!
ReplyDeleteFantastic! I hope that you find this very helpful!! Janelle
DeleteAmazing work. Thanks for sharing this information.Buy Designer Handbags for Women online in India at affordable price.
ReplyDeleteLeather handbags for women
Thank you for this tutorial. It is very easy to follow. You are awesome.
ReplyDeleteTrying to figure out how to sew the thickness with my Janome 4623LE, or my vintage Singer Fashionmate 237. Any suggestions?
ReplyDeleteAbsolutely brilliant idea and very clearly explained. Thank you.
ReplyDeleteLovely handbag. Gonna give it a try. Thanks for sharing this handbag making tutorial.
ReplyDeletePorterbons is a best Online Lifestyle Store which .offering the best product with high quality at competitive rates.
ReplyDeleteThank you for sharing and may God bless your work. When we sew the two straps together where should we place the end of seams shown in No. 6
ReplyDeleteLove this tutorial and can't wait to try it on my next faux leather strap. I have already been using the tip about tying off the thread ends to improve the finish whenever I topstitch.
ReplyDeleteOne question though, how would I modify this technique to create an adjustable strap?
You always provide quality based posts, enjoy reading your work first copy handbags India
ReplyDeleteNote: Only a member of this blog may post a comment.