 |
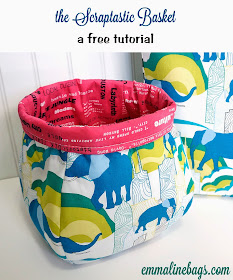
| Scraptastic Basket Shown here in LARGE size. |
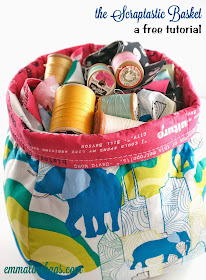
My thread and fabric scraps are EVERYWHERE, how about yours? I never have enough thread catching baskets, or baskets of scraps and this one is great because it holds plenty. Also, it stands up on it's own even when empty.
This basket goes together very quickly, and is suitable for a beginner to advanced sewist. Instructions and a downloadable pattern piece are provided just below.
First, a bit about the fabric I've chosen:
I was lucky enough to have some scraps left over from the Jungle Ave fabrics that Sara Lawson from Sew Sweetness sent to me, and decided to whip up a little extra something to show off these Art Gallery Fabrics. This is Sara's first fabric line with AGF and it's just beautiful. I've also made my new tote pattern "Totes Ma Tote" with these and you can read about it HERE.
Now... for the tutorial!!
 |
| Shown in Large Size. |
** TIP: If you would like to try it in different sizes, simply change the size on your photocopier!
** TAPE PIECE A & B TOGETHER TO MAKE ONE PATTERN PIECE.
** Seam allowances are 3/8" (1 cm).
** Backstitch all stops and starts to secure seams.
Materials:
For Exterior:
- Large: 1/2 m (1/2 yd) Quilting cotton or linen (I've used Elephant Skyline by Sara Lawson)
OR Small: 1/4 m (1/4 yd) (Not a Fat Quarter)
- Fusible Fleece (Such as Pellon Fusible Thermolam Plus)
For Lining:
- Large: 1/2 m (1/2 yd) Quilting cotton or linen (I've used Word on the Street by Sara Lawson)
OR Small: 1/4 m (1/4 yd) (Not a Fat Quarter)
- Light or medium weight fusible interfacing.
Let's get started:
1) Using the provided paper pattern piece, cut out the following:
- 4 Exterior Fabric
- 4 Fusible Fleece
- 4 Lining Fabric
- 4 Fusible Interfacing
2) Trim the Fusible Fleece and interfacing so that they are about 1/2" (12 mm) smaller around all edges than the fabric pieces.
3) Fuse the Fusible Fleece to the Exterior Fabric pieces, and the Fusible Interfacing to the Lining Fabric pieces using your iron and pressing cloth. Make sure you follow the manufacturer's directions to do this.
4) With RIGHT SIDES together, pair and pin two exterior pieces together along one long side. Sew down long side, using a 3/8" (1 cm) seam allowance. Repeat for other two exterior pieces.
6) Take all 4 sets to the ironing board and press back seam allowances so that they are open. Because of the curves, it may be easiest to do it like in the photos below. First press back one side of seam allowance, flip over unit, and press back the other side. Press all 4 seams open.
7) With RIGHT SIDES together, place one Exterior pair inside the other, as shown below, and pin around long sides, matching centre seams. Sew in place. Press this seam open too.
8) With RIGHT SIDES together, place one lining pair inside the other, and pin around long sides, matching centres. IMPORTANT: You will need to leave about a 4" (10 cm) opening along one side for turning. Sew in place, making sure to leave the opening. Press this seam open.
9) With RIGHT SIDES together, slide lining over exterior piece, matching and pinning at side seams. Pin around top opening.
10) Sew around basket opening. If you have a free arm on your sewing machine, it works well to use it here - I don't, but it still sews up nicely.
11) Turn basket out through turning hole, and tuck lining down inside exterior. Pin around Basket opening so that it is secure. Topstitch around opening using a 1/4" (6 mm) seam allowance.
12) Sew hole in lining closed, by either machine stitching next to seam or hand sewing. Fold down top of basket, and you are done!!
** Consider trying this in fabrics to match your baby nursery or office and store all kinds of things.
Thank you for reading, please leave a comment.
Janelle


This is adorable, and on my 'must make' list…thanks for sharing :)
ReplyDeleteI love the shape so cute, can you tell me why it is a 3/8" seam allowance? Purely curious.
ReplyDeleteSure Mara, no problem. Well... Mostly because quilting is always 1/4”, but not usually garments or bags. They have a wider seam allowance. Clothes are usually 5/8 or 1/2” and bags can range from there to 3/8”. I believe the seam allowance for bag making is smaller than garments, so you can reduce bulk in the seams, but not as small as quilting, so there is more sturdiness or integrity to the seams. Also, I polled my followers and most all agreed, by far, that they preferred the 3/8” seam allowance. I have delved into 1/4” only a few times, and that is usually for something that has to be turned Right side out, like a pocket. Or a zipper, but other than that, I try to stay at 3/8”. The necessary clutch wallet is constructed a bit different, so I went for the 1/4 “ there. I hope that helps! Thanks for reading! janelle
DeleteThanks Janelle for this cute pattern! I certainly have enough fabric to make this basket and enough scraps to fill it up too, lol!!!
ReplyDeleteThis is such a cute basket. It can be used for so many things!! I'm sure everyone has scraps to make more than one. I'm loving Sara's fabric collection. Can't wait to get my hands on it! Thanks for sharing the tutorial.
ReplyDeletewow I love the shape. Thank you for the tutorial
ReplyDeleteThank you, Lorena! Ya it's kinda cute ;)
DeleteI might have to make these in several colors to keep my scraps separated by color group...thanks for sharing!
ReplyDeleteLove that idea Jodi!!
DeleteThanks for sharing and participating in my link party! Your work is beautiful and the tutorial is sooo easy to follow (BTW great idea about changing the photocopier setting for the size-never thought about it)
ReplyDeleteI love your handbags and I wish you the best with your blog :)
Thanks, Janelle! These are great baskets, and I intend to make a bunch of them!
ReplyDeleteThank you for this tutorial. I now have your basket on my list of must makes. In fact it is right at the top. Beautiful.
ReplyDeletewhat a great shape! thanks for sharing
ReplyDeleteLove the basket. I just recently made bags from a similar pattern as gifts for several people. They loved them. The shape is so pleasing and holds a lot of stuff.
ReplyDeleteLove this for so many reasons...like rambling thread spools, stubbornly hiding sewing tools, disappearing notions, and so on....thanks! :D
ReplyDeleteThis is just SO cute! I have some great robot fabric that my little grandson picked out and I'm going to make him several of these to keep his little Matchbox cars in! Thank you for the great pattern and tute!
ReplyDeletehey Janelle, my first comment didn't show... are we allowed to sell ones we make? or can we buy a license?
ReplyDeleteYes you can!
DeleteLove the shape , and fab instructions too, thanks, I'm Pinning this so I can find it again, hope that's ok
ReplyDeleteof course! thank you
DeleteI love this. I am getting ready to make this as soon as I sign off. Thanks!
ReplyDeleteJust made the small one (great size!) to use as a gift basket for a baby shower. Now I want to to make the big one! Thanks for a great quick sewing project!
ReplyDeleteHi
ReplyDeleteThank you so much for sharing !!
I make one Large size .
So stinkin' cute!! I literally made three of them the same afternoon I first read this blog post, but it took me a while to write about making them (http://roonieranching.blogspot.com/2014/06/nesting-scraptastic-baskets.html). They turned out awesome. Such a sweet little design! I will definitely be making more of these. Thank you so much!!
ReplyDeleteThis is just to cute. I am definitely going to whip up a few of these for my sewing room :) Thanks Janelle ....
ReplyDeleteGlad you like it Jayne!!
DeleteJust found this tutorial and made the large one with beautiful halloween material to hand out sweets to the trick or treaters next weekend - it came out so well I am planning on making a load more for Christmas pressies. Thanks for the tutorial, its lovely and simple butthe end product looks amazing :-)
ReplyDeleteI am so glad to hear you liked it, Sam. Feel free to share your halloween basket in my Facebook group: Emmaline Sewing Patterns Group!
DeleteLove it!! I just made one for our Annual General Meeting to hold tickets for the door price! A novel way to use the basket, I'd say!!!
ReplyDeleteWow! Simply superb design! I live it and going to make one. Thanks for sharing the pattern!
ReplyDeleteI love your choice of fabric and think this will make a great way to save scraps and throw in my clipped threads. Thank you.
ReplyDelete